Automatically Refreshing Content Using WebSockets

For this project i used:
Overview
I was going to build a Twitter clone but...

so we'll recreate Chirper following the Laravel Bootcamp guide and build on top of the work done by Jess Archer and the Laravel team
Setup
Either follow the full tutorial on the Bootcamp website or here's one I made earlier...
https://github.com/michaelconnelly/laravel-chirper
The Chirper app already works well but if another user Chirps a new Chirp we don't see an updated list of Chirps without refreshing the page or seeing the notification that is a sent out.
Using WebSockets it is possible to automatically update the list of Chirps without having to refresh the page.
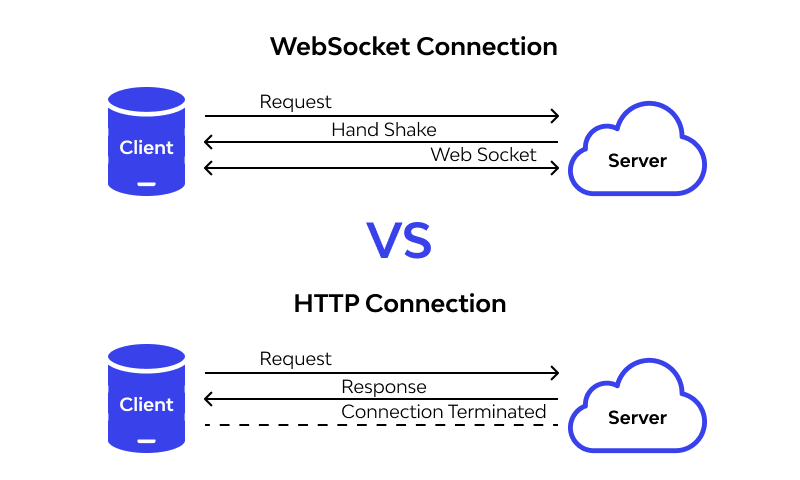
A Simple Explanation Of What A Websocket Is
Whereas a typical HTTP connection is terminated after a request and response takes place; for as long as the client and server are connected, a WebSocket remains open so data can be transmitted in both directions after the initial handshake.
Laravel WebSockets
Start by adding the Beyond Code Laravel WebSockets package by running the following commands
composer require beyondcode/laravel-websockets

php artisan vendor:publish --provider="BeyondCode\LaravelWebSockets\WebSocketsServiceProvider" --tag="migrations"

php artisan migrate

php artisan vendor:publish --provider="BeyondCode\LaravelWebSockets\WebSocketsServiceProvider" --tag="config"
We will be using Larvel WebSockets as a Pusher replacement, so install the pusher/pusher-php-server. I had trouble when trying to use the latest version with Laravel 9.41, but an earlier version works well.
composer require pusher/pusher-php-server:7.0.2
Update the .env file, setting the broadcast driver setting to pusher.
BROADCAST_DRIVER=pusher
and uncomment the BroadcastServiceProvider line in the config/app.php file
App\Providers\BroadcastServiceProvider::class,
Inside the .env file, update the pusher settings, I used the following for local development
PUSHER_APP_ID=laravel-chirper
PUSHER_APP_KEY=secret-key
PUSHER_APP_SECRET=secret
PUSHER_HOST=laravel-chirper.test
PUSHER_PORT=6001
PUSHER_SCHEME=http
PUSHER_APP_CLUSTER=mt1
Laravel Echo
Next up, add pusher-js and laravel-echo JavaScript packages
npm install --save-dev laravel-echo pusher-js
and then uncomment the pusher and Laravel Echo imports in bootstrap.js
import Echo from 'laravel-echo';

import Pusher from 'pusher-js';
window.Pusher = Pusher;

window.Echo = new Echo({
    broadcaster: 'pusher',
    key: import.meta.env.VITE_PUSHER_APP_KEY,
    wsHost: import.meta.env.VITE_PUSHER_HOST ? import.meta.env.VITE_PUSHER_HOST : `ws-${import.meta.env.VITE_PUSHER_APP_CLUSTER}.pusher.com`,
    wsPort: import.meta.env.VITE_PUSHER_PORT ?? 80,
    wssPort: import.meta.env.VITE_PUSHER_PORT ?? 443,
    forceTLS: (import.meta.env.VITE_PUSHER_SCHEME ?? 'https') === 'https',
    enabledTransports: ['ws', 'wss'],
});
Update the ChirpCreated event class to implement the ShouldBroadcast interface.
For this example the broadcastOn() method should return a new Channel instead of a private channel and a channel name of choice.
use Illuminate\Broadcasting\Channel;
use Illuminate\Contracts\Broadcasting\ShouldBroadcast;

class ChirpCreated implements ShouldBroadcast
{
    ...

    public function broadcastOn()
    {
        return new Channel('public.chirper');
    }
}
In Chirps/Index.vue, use Echo to connect to the channel set in ChirpCreated and listen for the ChirpCreated event to be fired. The class will automatically emit an event of the same name unless set otherwise in the broadcastAs() method.
Once Echo receives the ChirpCreated event it will reload the chirps prop and just fetch the updated list of Chirps from the ChirpController.
import { Inertia } from '@inertiajs/inertia';

Echo.channel('public.chirper')
    .listen('ChirpCreated', (e) => {
        Inertia.reload({ only: ['chirps'] })
    });
In order to simulate another user adding a new Chirp, I find it easiest to create a new command and factory
php artisan make:command CreateChirpCommand

php artisan make:factory ChirpFactory
and update as below:
class ChirpFactory extends Factory
{
    public function definition()
    {
        return [
            'message' => $this->faker->realText(),
        ];
    }
}
class CreateChirpCommand extends Command
{
    protected $signature = 'chirp:create';

    protected $description = 'Create a new chirp';

    public function handle()
    {
        $user = User::get()->random();

        $user->chirps()->create(Chirp::factory()->make()->toArray());

        return Command::SUCCESS;
    }
}
Start the WebSockets server by running
php artisan websockets:serve
and visit the '/chirps' route, in the console running the WebSockets server you should see that a new connection has opened up using your app key.
Create a new Chirp by running the php artisan chirp:create command in a terminal window and watch the newly created Chirp magically appear without needing to refresh!
Hopefully you can see from this example how easy it is to implement WebSockets within an app and how it can be quickly implemented with Laravel based to suit your own requirements.
Final Project: Chirper with WebSockets